To clean a carburetor, start by safely removing it from your engine. Disconnect the fuel lines and linkages carefully to avoid damage.
Next, disassemble key parts such as the float bowl, jets, and needle valve. Soak these components in a carburetor cleaner solution to dissolve grime and deposits.
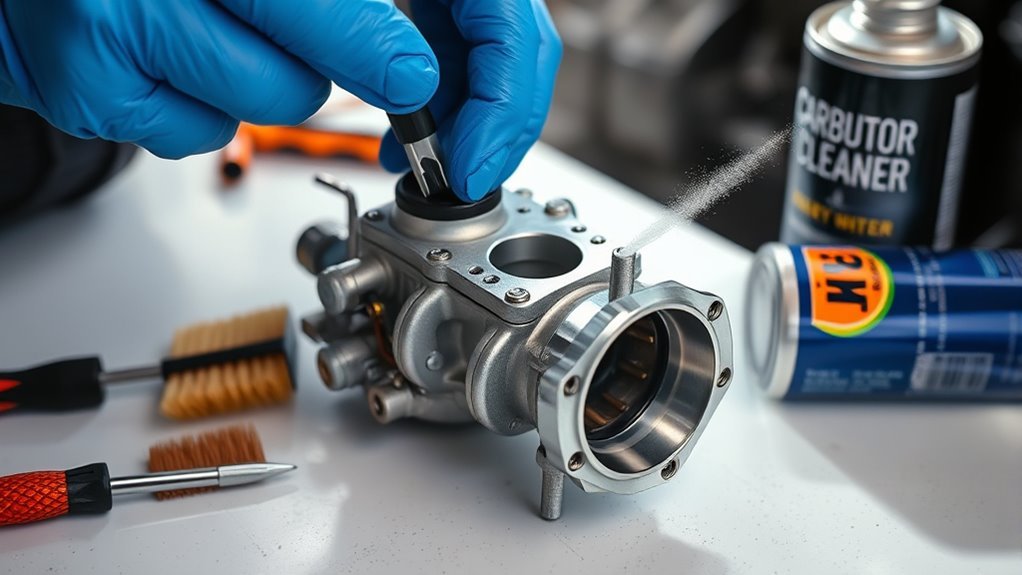
Use brushes and compressed air to thoroughly clear out any remaining deposits and clogs. Inspect each part for wear or damage before proceeding.
Once cleaned and inspected, reassemble the carburetor carefully, ensuring all parts are properly aligned. After reinstalling it, test the engine’s idling and throttle response.
Adjust the screws as needed to fine-tune performance. Keep following for detailed steps to restore peak carburetor performance.
Key Takeaways
- Remove the carburetor by disconnecting fuel lines, throttle linkage, and mounting bolts in a well-ventilated area.
- Disassemble parts like the float bowl, jets, and needle valve, keeping components organized for reassembly.
- Soak parts in carburetor cleaner, scrub with a soft brush, and clear jets and passages with compressed air or a fine wire.
- Reassemble carefully, aligning all parts properly, tightening fasteners evenly, and ensuring correct routing of linkages and fuel lines.
- Test by starting the engine, checking for smooth idle, proper throttle response, and no fuel leaks, adjusting as necessary.
How to Tell If Your Carburetor Needs Cleaning
Although your engine might run, signs like rough idling, poor acceleration, or increased fuel consumption indicate your carburetor likely needs cleaning.
These carburetor symptoms often result from clogged jets or deposits disrupting fuel-air mixture flow.
Clogged jets or deposits often disrupt the fuel-air mixture flow, causing common carburetor symptoms.
You should also watch for black smoke from the exhaust or difficulty starting the engine, as these signal improper fuel delivery.
Regular cleaning frequency depends on usage and environment but typically ranges from every 12,000 to 15,000 miles or annually for occasional use.
Ignoring these symptoms can lead to engine performance issues and higher emissions.
Monitoring your vehicle for these precise signs helps determine the best cleaning intervals, maintaining efficient operation and extending carburetor life.
Staying proactive prevents minor clogs from escalating into major repairs or replacements.
Common Carburetor Problems Cleaning Can Fix
You’ll often find that cleaning your carburetor resolves fuel flow issues by removing clogs and buildup.
It also helps prevent engine stalling caused by inconsistent fuel delivery.
Additionally, a thorough cleaning can stabilize idle speed by ensuring smooth operation of the throttle components.
Fuel Flow Issues
When fuel doesn’t flow properly through your carburetor, the engine can experience stalling, hesitation, or poor acceleration. These symptoms often stem from fuel delivery problems caused by clogging issues within the carburetor passages.
Dirt, varnish, or debris can obstruct jets, needles, and fuel channels, restricting flow and disrupting the air-fuel mixture. To fix this, you need to disassemble the carburetor carefully and use a specialized carburetor cleaner to dissolve deposits.
Pay close attention to tiny orifices and fuel passages, verifying they’re completely clear. After cleaning, inspect components for wear or damage before reassembling.
Properly restoring fuel delivery guarantees smooth engine performance and responsiveness, preventing fuel starvation and inefficient combustion.
Regular maintenance helps avoid future clogging and prolongs carburetor life.
Engine Stalling Causes
Since carburetors regulate the air-fuel mixture essential for combustion, any imbalance can cause engine stalling. When dirt, varnish, or debris clog the jets or passages, the mixture becomes inconsistent, impairing engine performance.
You’ll notice frequent stalls during acceleration or idling as the fuel supply fluctuates. Cleaning the carburetor removes these blockages, restoring the correct air-to-fuel ratio. This not only prevents stalling but also improves fuel efficiency by ensuring complete combustion.
Additionally, deposits on the throttle plate or choke mechanism can disrupt airflow, triggering stalls. By thoroughly cleaning these components, you maintain smooth engine operation and consistent power delivery.
Addressing these common carburetor issues will help you avoid stalling problems and optimize overall engine reliability and efficiency.
Idle Speed Problems
Carburetor cleanliness directly affects idle speed consistency and stability. When dirt or varnish builds up inside the carburetor, it can clog passages critical for maintaining proper idle. This often leads to idle speed problems such as fluctuating RPMs or engine stalling.
To fix these issues, thoroughly clean the carburetor, focusing on jets, passages, and the throttle body. After cleaning, use precise idle adjustment techniques to set the correct idle speed, ensuring smooth operation.
Additionally, removing blockages improves throttle response issues, allowing the engine to react promptly to accelerator input. Neglecting carburetor maintenance can result in uneven idling and poor throttle performance, so regular cleaning is essential for reliable engine function and consistent idle speed control.
Tools and Materials Needed for Carburetor Cleaning
Before you begin cleaning, gather all the essential tools and materials to guarantee a smooth and efficient process.
Using the correct items guarantees thorough cleaning while protecting both you and the carburetor components.
At a minimum, you’ll need:
- High-quality cleaning solutions, specifically formulated carburetor cleaners that dissolve varnish and carbon deposits without damaging metal or rubber parts.
- Protective gear, including nitrile gloves and safety goggles, to shield your skin and eyes from harsh chemicals and debris.
- A set of precision screwdrivers and small brushes to access tight spaces and remove buildup effectively.
Having these on hand allows you to work efficiently and safely, minimizing the risk of damage or injury.
Proper preparation is key to restoring peak carburetor function.
How to Safely Remove Your Carburetor
You’ll want to disconnect three main components when removing your carburetor: the fuel line, throttle linkage, and mounting bolts. Prioritize carburetor safety by working in a well-ventilated area and wearing gloves to prevent fuel exposure. Use proper removal techniques to avoid damaging delicate parts.
| Component | Tool Needed | Safety Tip |
|---|---|---|
| Fuel Line | Wrench or pliers | Clamp fuel line to prevent spills |
| Throttle Linkage | Screwdriver | Note linkage position for reassembly |
| Mounting Bolts | Socket set | Loosen bolts evenly to avoid warping |
Always relieve fuel system pressure before starting. Label parts and take photos to ease reinstallation. These steps guarantee a safe, efficient removal process without damage or contamination.
How to Disassemble Your Carburetor Step-by-Step
After safely removing the carburetor, the next step involves carefully disassembling its components to inspect and clean each part.
Follow these precise steps to guarantee effective carburetor maintenance:
- Remove the float bowl by unscrewing the retaining screws carefully, avoiding damage to the gasket.
- Detach the float assembly and needle valve, noting their positions for accurate reassembly.
- Extract jets and screws using the appropriate tools, keeping them organized to prevent loss.
Adhering to carburetor maintenance tips, disassemble only as much as necessary to avoid complications.
Regular cleaning frequency recommendations suggest inspecting and disassembling your carburetor every 12 months or sooner if performance issues arise.
This careful approach sets you up for thorough cleaning and peak engine performance.
How to Clean Carburetor Parts Thoroughly
Once you’ve disassembled the carburetor components, soak each part in a suitable cleaner to dissolve deposits.
Use a brush to scrub away remaining residue and guarantee all passages are clear.
Finally, inspect each piece thoroughly for wear or damage before reassembly.
Disassemble Carburetor Components
Begin by carefully removing all external components attached to the carburetor, including the throttle linkage, fuel lines, and air filter assembly.
For effective carburetor maintenance, precise disassembly techniques are crucial. Follow these steps:
- Detach the float bowl by unscrewing its retaining screws; handle the float and needle valve gently to avoid damage.
- Remove jets, emulsion tubes, and screws, keeping track of their original positions for accurate reassembly.
- Extract the throttle shaft and choke assembly, inspecting for wear or corrosion.
Use appropriate tools to prevent stripping or damaging delicate parts.
Organize components systematically to streamline cleaning and reassembly.
Mastering these disassembly techniques guarantees thorough inspection and prepares each part for the next cleaning phase.
Soak Parts In Cleaner
Although disassembled parts can appear clean, soaking them in a specialized carburetor cleaner dissolves stubborn varnish, deposits, and grime embedded in small passages and surfaces.
Use a recommended soaking solution specifically formulated for carburetors to guarantee effective chemical action without damaging components.
Submerge all metal parts fully, avoiding rubber or plastic components that may degrade.
Pay close attention to cleaning duration: typically, 20 to 30 minutes suffices for moderate buildup, but heavily soiled parts may require up to an hour.
Avoid excessive soaking to prevent corrosion or material weakening.
Agitate the solution gently if possible to enhance penetration.
After soaking, rinse parts thoroughly with water or a compatible solvent to remove residual cleaner and dissolved contaminants, preparing them for the next cleaning step.
Scrub And Inspect Thoroughly
After soaking, you’ll need to scrub each part carefully to remove any remaining deposits or residues that the cleaner couldn’t dissolve.
Use proper cleaning techniques to avoid damaging delicate components.
Follow these carburetor maintenance tips for effective scrubbing and inspection:
- Use a soft-bristle brush and carburetor-safe solvent to gently clean passages and surfaces without abrasion.
- Inspect parts under bright light or magnification, checking for cracks, corrosion, or warping that could impair function.
- Clear all jets, passages, and orifices with compressed air or a fine wire tool to guarantee unobstructed fuel flow.
This thorough approach guarantees peak performance and longevity of your carburetor by preventing clogs and mechanical failures.
How to Reassemble and Reinstall Your Carburetor
Carefully align all components to their original positions as you start reassembling the carburetor, guaranteeing each gasket and seal fits snugly to prevent air leaks.
Use precise reassembly techniques to avoid damaging delicate parts, paying close attention to the orientation of jets, diaphragms, and screws.
Handle jets, diaphragms, and screws carefully during reassembly to ensure correct orientation and prevent damage.
Tighten fasteners evenly but avoid over-torquing to maintain proper sealing without warping components.
When reinstalling the carburetor, attach it securely to the intake manifold using the correct torque specifications.
Reconnect all linkages, fuel lines, and vacuum hoses exactly as they were, verifying their routing to prevent kinks or disconnections.
Follow installation tips such as checking for clean mating surfaces and replacing old gaskets.
Proper reassembly and installation guarantee peak carburetor performance and prevent operational issues.
Testing Your Carburetor After Cleaning
Once you’ve reassembled and reinstalled the carburetor, you’ll need to verify its functionality through a series of performance tests.
Proper testing guarantees ideal carburetor performance and identifies any necessary post cleaning adjustments. Follow these steps:
- Start the engine and listen for smooth idling; rough or fluctuating idle signals potential issues.
- Check throttle response by gradually increasing engine speed; hesitation or stalling suggests fuel delivery problems.
- Inspect for fuel leaks around the carburetor base and connections during operation; leaks compromise performance and safety.
If you observe abnormalities, adjust the idle mixture screws or float level as needed.
Accurate post cleaning adjustments ensure that your carburetor operates efficiently, prolonging engine life and improving fuel economy.
Frequently Asked Questions
Can Carburetor Cleaning Improve Fuel Efficiency?
Yes, regular carburetor maintenance directly improves fuel efficiency by ensuring ideal air-fuel mixture. When you clean your carburetor, you prevent clogging and inefficient combustion, which helps your engine run smoothly and saves fuel.
How Often Should I Clean My Carburetor?
You should perform carburetor maintenance every 12,000 to 15,000 miles, adjusting cleaning frequency based on usage and fuel quality.
Regular checks prevent buildup, ensuring peak engine performance and fuel efficiency through timely cleaning.
Is It Necessary to Replace the Carburetor After Cleaning?
You don’t have to replace the carburetor after cleaning if you apply proper carburetor maintenance and cleaning techniques.
Replacement is only necessary when parts are damaged, corroded, or cleaning doesn’t restore peak performance.
Can I Use Carburetor Cleaner on Fuel Injectors?
Think of your fuel injector as a delicate watch; you shouldn’t use carburetor spray on it. Carburetor cleaner’s harsh chemicals can damage fuel injectors, so always use a cleaner specifically formulated for fuel injectors.
What Are the Symptoms of a Damaged Carburetor Float?
You’ll notice fuel leaks, engine flooding, or stalling if your carburetor float is damaged. Poor float adjustment can cause erratic fuel levels, leading to these symptoms.
Check and adjust the float precisely for proper function.
Conclusion
Now that you’ve mastered the fine art of carburetor cleaning—because who doesn’t want to play mechanic in their free time?—your engine will purr like a kitten instead of cough like a grumpy cat.
Remember, precision and patience make all the difference, so don’t rush. If you skipped any step, well, enjoy that extra smoke show.
Otherwise, pat yourself on the back—you’ve just given your carburetor a spa day it desperately needed. This thorough carburetor cleaning will keep your engine running smoothly for miles to come.