To change your oil and oil filter, first gather the correct oil, filter, and tools. Make sure you safely lift your vehicle on a flat surface with the parking brake engaged.
Drain the old oil by removing the drain plug, then unscrew the old filter. Apply oil to the new filter gasket, install it by hand, and tighten appropriately.
Add fresh oil according to your manual’s specifications. Check the oil levels and inspect for leaks.
Proper disposal of used oil and filters protects the environment. Follow these steps carefully for a thorough service.
Key Takeaways
- Prepare the vehicle on a flat surface, engage the parking brake, and secure with jack stands or ramps for safety.
- Drain old oil by removing the drain plug into a pan, then remove and inspect the old oil filter.
- Apply fresh oil to the new filter gasket, hand-tighten the filter, then refill engine with specified oil type and amount.
- Start the engine briefly to circulate oil, check for leaks, then verify oil level with the dipstick and add if needed.
- Collect used oil and filters in proper containers and dispose of them at authorized recycling centers following local regulations.
Gather the Tools and Materials You’ll Need
Before you begin changing your oil and oil filter, gather all necessary tools and materials to guarantee a smooth process.
Start by selecting the correct oil type specified in your vehicle’s manual. Common options include conventional, synthetic, or blends.
Next, choose the appropriate oil filter size, confirming compatibility with your engine model.
Essential tools include a wrench set, an oil filter wrench, a drain pan, and a funnel for precise pouring. You’ll also need gloves and rags for cleanliness.
Verify the oil capacity to measure the correct quantity. Having these items ready prevents interruptions and errors during the procedure.
Organize everything logically for efficient access, reducing downtime and enhancing safety.
This preparation guarantees your oil change proceeds systematically and effectively.
Prepare Your Vehicle: Safety Tips and Setup for Oil Change
Before starting, make sure your vehicle is securely supported on a flat surface using jack stands or ramps to prevent movement. Collect all required tools within reach, including wrenches, drain pans, and replacement parts.
Always wear gloves and safety glasses to protect yourself from hot oil and sharp components.
Ensure Vehicle Stability
A level, solid surface provides the foundation for a safe and stable oil change. Begin by parking your vehicle on concrete or asphalt, avoiding inclined or uneven terrain that compromises vehicle stability. Engage the parking brake firmly to prevent any movement during the procedure.
If available, place wheel chocks behind the rear wheels for additional restraint. These safety precautions reduce the risk of accidental rolling or shifting.
Next, if you need to raise the vehicle, use a certified hydraulic jack positioned at the manufacturer’s recommended lift points.
Securely support the vehicle with jack stands rated for its weight before working underneath. Never rely solely on the jack, as this jeopardizes safety.
Gather Necessary Tools
Gathering the necessary tools guarantees a smooth and efficient oil change process. First, identify the correct oil types specified for your vehicle to ascertain maximum engine performance.
Next, select the appropriate oil filter size, matching the manufacturer’s recommendations precisely to avoid leaks or improper fit.
You’ll need a wrench set for loosening the drain plug and filter housing, plus a drain pan to catch used oil. Have a funnel ready to prevent spills when adding new oil. Additionally, keep clean rags or paper towels on hand for quick cleanup.
Confirm you have a jack or ramps if your vehicle’s clearance is low, assuring safe access to the oil drain plug and filter.
Preparing these tools methodically minimizes errors and streamlines the oil change procedure.
Wear Protective Gear
Wearing protective gloves and safety glasses shields your skin and eyes from hot oil and harmful chemicals during the oil change.
Before starting, put on durable protective gloves to prevent skin contact with used oil, which contains contaminants and irritants. Choose gloves resistant to oils and solvents for maximum protection.
Next, wear safety goggles to protect your eyes from splashes when draining the oil or removing the filter. Confirm your goggles fit snugly to prevent any fluid ingress. This protective gear minimizes risk of chemical burns, allergic reactions, and eye injuries.
Always inspect gloves and goggles for damage before use.
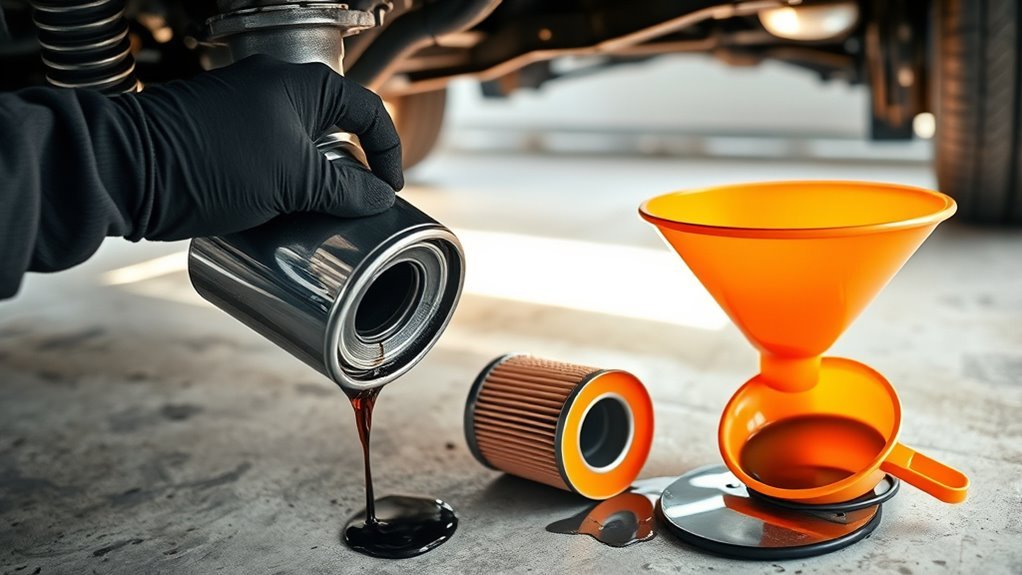
Drain Old Oil and Remove Old Oil Filter
Start by positioning a drain pan beneath the oil drain plug to catch the used oil. Use a wrench to loosen the plug carefully, allowing oil to flow out steadily.
Let the oil drain completely to avoid contamination. Once drained, reinstall the drain plug securely, guaranteeing the correct torque specifications are met to prevent leaks.
Next, move to the oil filter removal. Use an oil filter wrench to loosen the old filter, turning it counterclockwise.
Be prepared for residual oil to spill during removal; keep the drain pan positioned accordingly. Inspect the filter mounting surface for debris or old gasket remnants, cleaning as necessary to confirm a proper seal with the new filter.
Completing these steps prepares the engine for fresh oil and a new filter.
Install the New Oil Filter
Start by preparing the new oil filter and applying a thin layer of fresh oil to the rubber gasket to guarantee a proper seal.
Align the filter carefully and screw it onto the mounting base by hand.
Tighten the filter securely, following the manufacturer’s torque specifications to avoid leaks or damage.
Prepare New Filter
Before installing the new oil filter, make certain you apply a thin layer of fresh oil to the rubber gasket; this creates a proper seal and prevents leaks.
Identify the filter type, spin-on or cartridge, to determine the correct installation procedure. Spin-on filters screw directly onto the engine block, while cartridge filters require housing assembly.
Use installation tips such as hand-tightening the filter until the gasket contacts the mounting surface, then turn it an additional 3/4 to 1 full turn.
Avoid over-tightening, which can damage the gasket or complicate future removal. Confirm the filter is clean and free of debris before installation.
Position the filter straight to prevent cross-threading. Following these steps guarantees a secure, leak-free fit that maintains peak engine performance.
Apply Oil To Gasket
Apply a thin layer of fresh engine oil evenly around the rubber gasket on the new filter. This step guarantees a proper seal and prevents the gasket from binding or tearing during installation.
Verify oil compatibility by using the same grade and type recommended for your engine to maintain gasket integrity. Different gasket types, such as nitrile rubber or silicone, may have specific lubrication needs, so consult the filter manufacturer’s guidelines.
Avoid over-applying oil; a light, uniform coat suffices to enhance the seal and ease filter removal during the next oil change. Properly lubricating the gasket reduces the risk of leaks and guarantees consistent oil pressure.
Always handle the filter carefully to preserve the gasket’s shape and effectiveness before proceeding with installation.
Tighten Filter Properly
Once you’ve evenly coated the new filter gasket with oil to guarantee a proper seal, position the filter carefully onto the mounting surface, aligning the threads correctly.
Proper filter orientation is critical to prevent leaks and guarantee peak performance.
Follow these steps to tighten the filter properly:
- Hand-tighten the filter clockwise until the gasket contacts the mounting surface.
- Using a filter wrench, apply the specified filter torque, typically ¾ to 1 turn past gasket contact; consult your vehicle’s manual for exact values.
- Avoid over-tightening, which can damage the gasket or housing, causing leaks or difficult future removal.
Adhering strictly to these procedures guarantees a secure installation and peak oil flow, preventing premature filter failure and maintaining engine integrity.
Add Fresh Oil and Check for Leaks and Oil Levels
Although adding fresh oil requires careful attention, you’ll assure engine longevity by using the correct oil type and quantity specified for your vehicle.
Begin by consulting your owner’s manual to select the proper oil viscosity to guarantee ideal lubrication.
Remove the oil filler cap and slowly pour in the fresh oil using a clean funnel, preventing spills. After filling, replace the cap securely.
Start the engine and let it run for a few minutes to circulate the oil thoroughly.
Perform leak detection by inspecting around the drain plug and oil filter for any signs of leakage.
Finally, turn off the engine, wait a few minutes, and check the oil level with the dipstick, adding oil if necessary to reach the recommended mark.
How to Dispose of Old Oil and Filters the Right Way
After confirming the oil level and verifying there are no leaks, focus on disposing of the used oil and filters properly.
Adhering to disposal regulations is essential to prevent environmental contamination. Follow these steps:
- Collect the used oil in a clean, leak-proof container with a secure lid. Avoid mixing with other fluids.
- Place used oil filters in a sealable plastic bag or container to prevent residual oil leakage.
- Deliver both the oil and filters to an authorized oil recycling center or hazardous waste facility.
Never pour used oil down drains, onto soil, or in regular trash. Proper oil recycling conserves resources and complies with environmental laws.
Frequently Asked Questions
How Often Should I Change My Oil and Oil Filter?
You should follow your vehicle’s maintenance schedule, typically changing oil and oil filter every 3,000 to 7,500 miles.
Oil change frequency depends on driving conditions and oil type, so always consult your owner’s manual for precision.
What Type of Oil Is Best for My Car?
Selecting synthetic oil surpasses standard conventional oil for superior stability and strength. Still, study your car’s manual to secure specific specifications.
Synthetic offers enhanced efficiency, while conventional suits older engines requiring basic lubrication.
Can I Reuse an Old Oil Filter?
You shouldn’t reuse an old oil filter due to compromised oil filter longevity and potential contaminants.
Replacing it guarantees peak engine protection and minimizes environmental impact by preventing oil leakage and pollution from degraded filters.
What Are Signs My Car Needs an Oil Change Sooner?
You’ll notice decreased engine performance, unusual noises, or a burning oil smell when your car needs an oil change sooner. Also, check the oil’s color and consistency regularly to prevent damage and maintain ideal engine function.
How Does Driving Style Affect Oil Change Frequency?
Your driving habits directly impact oil degradation; aggressive acceleration, frequent short trips, and stop-and-go traffic accelerate oil breakdown. Adjust your oil change frequency accordingly to maintain peak engine performance and prevent premature wear.
Conclusion
Changing your oil and filter is like giving your engine a fresh set of lungs—essential for keeping it running smoothly. By following each step carefully, from draining old oil to properly disposing of waste, you guarantee your vehicle’s longevity and performance.
Stay methodical and precise, double-checking for leaks and correct oil levels before finishing. Regular maintenance like this isn’t just routine; it’s the foundation for reliable, efficient driving. Remember, mastering how to change oil and oil filter is key to maintaining your vehicle’s health.