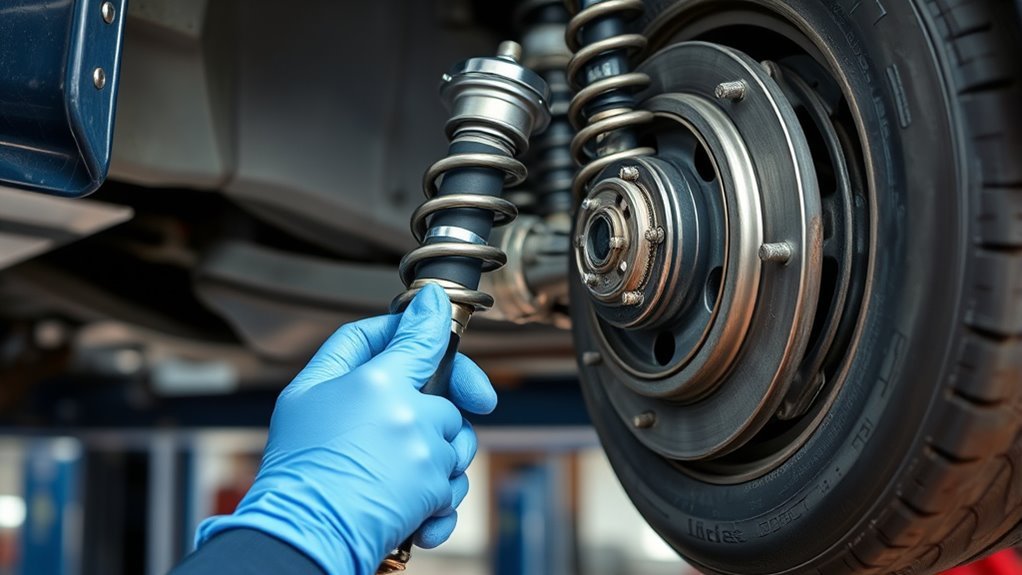
Tag: struts installation

  • How to Replace Shocks and Struts

    How to Replace Shocks and Struts

    To replace shocks and struts, first securely lift and support your vehicle using manufacturer-recommended jack points and quality jack stands. This is an essential step to ensure safety during the process.

    Remove the old parts by unbolting the mounting hardware. If you are handling struts, compress the coil springs safely using a spring compressor.

    Install new shocks or struts by aligning the mounts properly and tightening bolts to the specified torque values. After assembly, verify fasteners and component seating before lowering the vehicle.

    Understanding these steps guarantees a safe, effective repair — there’s more to master for flawless suspension performance.

    Key Takeaways

    • Securely lift the vehicle using manufacturer-recommended jack points and support it with high-quality jack stands before starting.
    • Remove old shocks by unbolting upper and lower mounts, and compress coil springs safely when dealing with struts.
    • Use a spring compressor to decompress coil springs and detach the strut assembly by loosening top mount and lower bolts.
    • Install new shocks or struts by aligning mounting points and tightening all bolts to manufacturer-specified torque values.
    • Before lowering, double-check fasteners, confirm proper seating of components, and inspect for correct positioning of dust boots and bump stops.

    Tools and Parts Needed for Shock and Strut Replacement

    To replace shocks and struts effectively, you’ll need a specific set of tools and parts prepared in advance. Start by identifying the correct shock absorber types for your vehicle, whether twin-tube, monotube, or gas-charged, as this guarantees compatibility and performance.

    Identify the correct shock absorber type to ensure compatibility and optimal performance before replacement.

    For strut replacement, obtain a complete strut assembly or individual strut assembly components such as the coil spring, mount, and bearing.

    Essential tools include a spring compressor for safely handling coil springs, a socket set with ratchets and extensions, a torque wrench, and penetrating oil for rusted fasteners.

    Additionally, have a breaker bar and a jack stand ready, but we’ll cover vehicle support later.

    Preparing these tools and parts precisely will streamline the replacement process and maintain suspension integrity.

    Lift and Support Your Vehicle Safely

    Start by locating the manufacturer’s recommended jack points to avoid damaging your vehicle’s frame.

    Use high-quality jack stands to securely support the car once it’s lifted.

    Always confirm the vehicle is stable before beginning any work underneath.

    Choose Proper Jack Points

    Anyone working on suspension components must identify the proper jack points on the vehicle’s frame or designated lift areas. Choosing the correct jack location is critical to maintaining vehicle stability and avoiding damage.

    Follow these steps:

    1. Consult your vehicle’s owner manual to locate factory-recommended jack points.
    2. Inspect the frame or pinch welds near the wheels for reinforced areas designed to bear weight.
    3. Avoid placing the jack on plastic parts, fuel lines, or suspension components.
    4. Position the jack securely under the identified point, ensuring it’s centered to distribute weight evenly.

    Proper jack location guarantees a stable lift, preventing the vehicle from shifting or falling during shock or strut replacement.

    Always double-check the jack point before lifting to protect both yourself and your vehicle.

    Use Quality Jack Stands

    Although lifting your vehicle with a jack is essential, you must support it with quality jack stands to guarantee safety throughout the repair.

    Prioritize jack stand safety by selecting stands rated for your vehicle’s weight, ensuring they’ve a solid, stable base and durable construction.

    When choosing jackstands, opt for those with adjustable height locks that securely engage to prevent accidental collapse.

    Avoid cheap or damaged stands, as they compromise stability and increase risk.

    Place each jack stand under the manufacturer’s recommended lift points, and confirm they sit firmly on a flat, hard surface.

    By carefully choosing jackstands built to meet or exceed safety standards, you maintain a secure work environment, minimizing hazards while replacing shocks and struts.

    Never rely solely on a hydraulic jack for vehicle support.

    Ensure Stable Vehicle Position

    Before you lift your vehicle, verify it’s parked on a flat, level surface to prevent any shifting or tipping during the repair. Securing your vehicle properly is essential for maintaining shock absorber performance and guaranteeing the strut assembly functions safely during replacement.

    Follow these steps to guarantee stable vehicle positioning:

    1. Engage the parking brake firmly to immobilize the vehicle.
    2. Place wheel chocks on the wheels remaining on the ground to prevent roll.
    3. Position the jack under the manufacturer-recommended lift point to avoid frame damage.
    4. After raising the vehicle, install quality jack stands firmly under solid frame locations before removing the jack.

    This setup stabilizes the vehicle, protecting you and preserving component integrity while you service the shocks and struts.

    Remove Old Shocks and Struts

    Begin by safely lifting and supporting your vehicle to access the suspension components.

    Start with old shock identification by inspecting for leaks, dents, or worn bushings, confirming which shocks or struts require replacement.

    For shock removal, unbolt the lower and upper mounting hardware using the appropriate sockets and wrenches.

    When removing struts, apply strut removal techniques such as compressing the coil spring with a spring compressor to relieve tension safely.

    Then, detach the strut assembly by loosening the top mount bolts inside the engine bay or trunk and the lower mounting bolts near the wheel hub.

    Keep track of all hardware and components removed for proper reassembly.

    Avoid forcing parts; if stuck, use penetrating oil and gentle prying to prevent damage.

    Install New Shocks and Struts Correctly

    Before you begin installing new shocks and struts, make sure you follow all safety precautions to prevent injury.

    Use the correct tools designed for suspension work to guarantee proper fit and torque specifications.

    Follow a step-by-step installation process to secure components accurately and maintain vehicle performance.

    Safety Precautions First

    Two critical safety precautions guarantee you install new shocks and struts without injury or damage: securely lifting the vehicle and properly supporting it with jack stands.

    Before starting, always wear appropriate personal protective equipment to safeguard against debris and chemical exposure.

    Create a safe work environment by clearing the area and guaranteeing adequate lighting.

    Follow these steps:

    1. Use a reliable jack to lift the vehicle at manufacturer-specified lift points.
    2. Position jack stands under solid frame sections to support the vehicle securely.
    3. Double-check stability before removing any suspension components.
    4. Keep tools organized and maintain clear access to prevent tripping hazards.

    Adhering to these safety measures minimizes risks and guarantees your shock and strut replacement proceeds smoothly and safely.

    Proper Tool Selection

    Although having new shocks and struts ready is essential, selecting the proper tools secures a correct and efficient installation. You’ll need specific tool types such as spring compressors, socket wrenches, torque wrenches, and strut nut sockets.

    Choosing high-quality tool brands like Snap-on, Craftsman, or Tekton guarantees durability and accuracy. Spring compressors must match the shock or strut size to safely compress coil springs. Torque wrenches calibrated to the vehicle manufacturer’s specifications prevent over-tightening or under-tightening fasteners.

    Avoid generic or worn tools to reduce the risk of damage or injury. Organize your tools before starting to streamline the process, and verify all tool types correspond to your vehicle model.

    Proper tool selection is fundamental to a secure, professional installation.

    Step-by-Step Installation Guide

    Once you’ve gathered the appropriate tools and new components, you can begin the installation by safely lifting and securing the vehicle.

    Proper shock absorption and ideal strut performance depend on precise installation. Follow these steps:

    1. Remove the old shocks or struts by loosening bolts and disconnecting any mounting hardware.
    2. Align the new shock or strut assembly carefully, ensuring the mounting points match exactly.
    3. Tighten all bolts to the manufacturer’s specified torque, securing the unit firmly without over-tightening.
    4. Reattach any components removed during disassembly, and lower the vehicle safely.

    After installation, test drive to confirm improved shock absorption and strut performance.

    Proper torque and alignment are critical to avoid premature wear and maintain vehicle stability.

    Troubles You Might Face When Replacing Shocks and Struts

    When replacing shocks and struts, you might encounter challenges such as stubborn bolts, worn-out components, or alignment issues. One common mistake is forcing bolts without proper lubrication, which can strip threads or break studs.

    Use penetrating oil and appropriate tools to ease bolt removal. Another issue is misidentifying worn parts, leading to ineffective repairs. Inspect all suspension components carefully before replacement.

    Troubleshooting tips include verifying torque specifications to avoid under- or over-tightening fasteners, which can cause premature wear or failure.

    Alignment problems often arise if the suspension geometry shifts during installation. Double-check mounting positions and consider a professional alignment afterward.

    Address these challenges methodically to guarantee a safe, durable repair and avoid common pitfalls.

    Check Your Work Before Lowering the Vehicle

    Before lowering the vehicle, double-check all fasteners to verify they meet the specified torque values and confirm that the shocks and struts are properly seated in their mounts. This final inspection is critical to guarantee safety and performance.

    Always double-check fasteners and ensure shocks and struts are securely seated before lowering the vehicle for safety.

    Follow these steps:

    1. Re-torque all bolts to manufacturer specifications using a calibrated torque wrench.
    2. Inspect mounting points for secure fitment and absence of gaps or misalignment.
    3. Verify that all dust boots and bump stops are correctly positioned.
    4. Check brake and suspension components disturbed during the process for proper reassembly.

    Once confirmed, carefully lower the vehicle.

    Perform a controlled test drive to assess handling and confirm the new shocks and struts function correctly. Address any unusual noises or vibrations immediately before regular use.

    How to Tell When Your Shocks and Struts Need Replacing

    How can you determine if your shocks and struts require replacement? Begin by inspecting for obvious symptoms of wear such as fluid leaks, dented or damaged components, and uneven tire wear.

    Next, evaluate the vehicle’s performance impact: excessive bouncing after hitting a bump, nose-diving during braking, or swaying in turns indicate compromised shock or strut function.

    Conduct a bounce test by pressing down firmly on each corner of the vehicle; if it bounces more than twice, the shocks or struts likely need replacing.

    Additionally, listen for unusual noises like clunking when driving over rough terrain.

    Monitoring these symptoms of wear closely guarantees you maintain peak ride stability and control. Replace shocks and struts promptly to avoid further suspension damage and maintain safety.

    When to Consider Professional Help for Shock and Strut Replacement

    Although replacing shocks and struts can be a straightforward task for experienced DIYers, you should consider professional help if you lack the necessary tools or technical knowledge.

    This is especially important if your vehicle uses advanced suspension systems.

    Here are key indicators that professional expertise is necessary:

    1. You encounter complex suspension designs requiring specialized equipment.
    2. Cost considerations make purchasing tools impractical compared to professional service fees.
    3. You notice unusual noises or handling issues during test drives after basic repairs.
    4. Safety-critical components, like strut mounts or electronic sensors, require precise calibration.

    Tips to Maintain Your Shocks and Struts After Replacement

    Once you’ve replaced your shocks and struts, maintaining their performance hinges on regular inspections and mindful driving habits.

    Start with shock maintenance by checking for fluid leaks, damaged mounts, and unusual noises every 5,000 miles. Clean the components to prevent dirt buildup that accelerates wear.

    Inspect shocks every 5,000 miles for leaks, damaged mounts, and noises to ensure longevity.

    For effective strut care, inspect the strut assembly for corrosion or cracks, and confirm the coil springs remain intact. Avoid aggressive driving, such as rapid acceleration or hard braking, which stresses suspension components.

    Additionally, keep your tires properly inflated and aligned to reduce uneven load on shocks and struts. Scheduling periodic suspension system evaluations will help you identify early signs of wear.

    Frequently Asked Questions

    What Are the Differences Between Shocks and Struts?

    You’ll find a shock absorber controls movement by damping, while a strut assembly combines a shock absorber with structural support. It bears weight and aligns suspension components, making struts more integral to your vehicle’s suspension system.

    Can I Replace Shocks and Struts on All Vehicle Types?

    You can replace shocks and struts on most vehicle types, but always follow specific replacement guidelines for your model. Some vehicles require special tools or procedures, so consult your service manual to guarantee proper installation and safety.

    How Do Worn Shocks and Struts Affect Vehicle Safety?

    Worn shocks and struts degrade suspension performance, reducing your vehicle handling precision. This compromises stability during turns, increases stopping distances, and causes uneven tire wear.

    These issues directly affect your safety and control on the road.

    What Is the Average Cost of Professional Shock and Strut Replacement?

    The average costs for professional services replacing shocks and struts range between $400 and $900, depending on your vehicle type and parts quality.

    You should budget accordingly for labor and high-quality components to guarantee peak performance.

    How Long Do Shocks and Struts Typically Last Before Replacement?

    You might think shock lifespan and strut durability vary wildly, but typically, shocks and struts last 50,000 to 100,000 miles. Regularly inspect them to maintain ideal vehicle stability and prevent premature wear or failure.

    Conclusion

    Replacing your shocks and struts isn’t just a task—it’s the backbone of your vehicle’s smooth ride and safety.

    By following each step carefully, you guarantee your suspension works like new, absorbing bumps and keeping control sharp. Remember, proper tools and precautions are your best allies.

    If challenges arise, don’t hesitate to seek help. With routine checks and maintenance, your shocks and struts will keep performing like the silent guardians they are on every journey.

    Proper replacement of your shocks and struts ensures your vehicle remains stable and comfortable, making it essential to the overall performance and safety of your car.