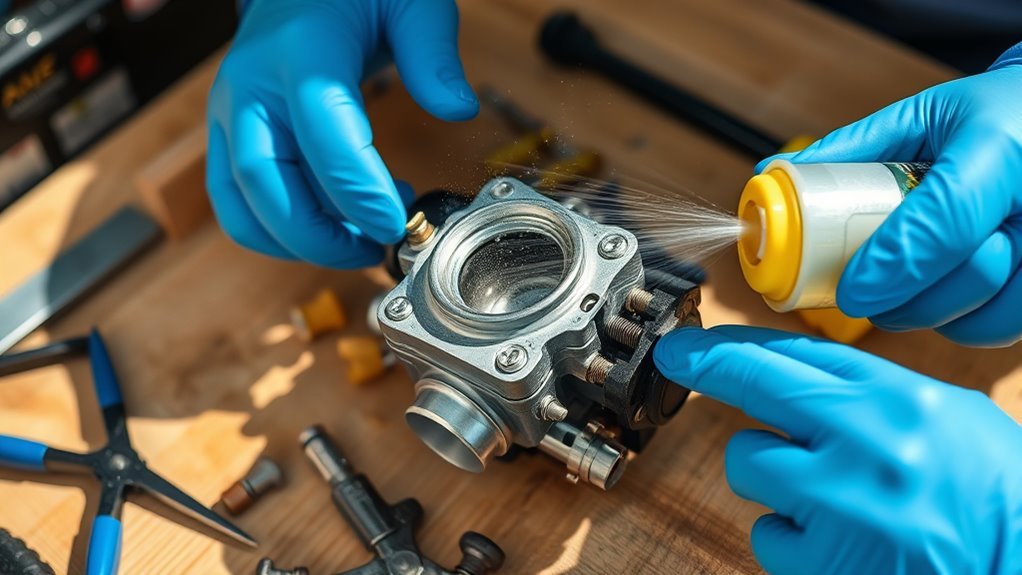
You’ll know your snow thrower’s carburetor needs cleaning if it sputters, stalls, or struggles to start. Cleaning the snow thrower carburetor is essential to maintain smooth operation and prevent engine issues.
First, drain the fuel, turn off the engine, and remove the air filter. Carefully disconnect the fuel lines and throttle linkages, then take out the carburetor.
Soak the parts in carburetor cleaner, brush the jets and passages, then dry and reassemble with new gaskets if needed. Proper cleaning restores performance and prevents damage; there’s more to guarantee your carburetor runs smoothly.
Key Takeaways
- Identify symptoms like sputtering, stalling, or black smoke indicating carburetor needs cleaning.
- Drain fuel, remove air filter, and work in a ventilated area with proper tools for safe carburetor removal.
- Disconnect throttle linkage and fuel lines carefully, keeping track of parts and positions.
- Soak carburetor parts in cleaner, scrub jets and valves, dry thoroughly, and replace worn gaskets.
- Reassemble carburetor securely, then test for leaks or clogs and replace damaged components if needed.
How to Know When Your Snow Thrower Carburetor Needs Cleaning
Although your snow thrower may start normally, you should clean the carburetor if you notice engine sputtering, difficulty starting, or reduced power during operation. These are key signs clogging has affected fuel flow, impairing combustion efficiency.
Performance issues like inconsistent idling, stalling, or black smoke from the exhaust also indicate carburetor problems. Fuel residues and debris accumulate over time, restricting jets and passages, which reduces engine responsiveness.
Inconsistent idling, stalling, or black smoke signal carburetor clogs affecting engine performance.
Ignoring these symptoms can lead to further mechanical damage and costly repairs. Regularly inspecting your snow thrower for these signs clogging will help you maintain peak function.
When these performance issues arise, cleaning the carburetor promptly restores proper fuel-air mixture, ensuring smooth operation and prolonging the equipment’s lifespan.
How to Prepare Your Snow Thrower Carburetor for Cleaning
Before you start cleaning your snow thrower carburetor, make certain the engine is completely cool and the fuel supply is turned off to prevent accidents.
Next, position the snow thrower in a well-ventilated workspace and gather necessary tools for carburetor maintenance, including screwdrivers, wrenches, and carburetor cleaner.
Drain any remaining fuel from the tank and carburetor bowl to avoid spills and contamination.
Remove the air filter to access the carburetor easily. Inspect the area for debris or ice buildup that could interfere with cleaning.
Preparing your carburetor thoroughly guarantees a safer, more effective cleaning process, critical for winter preparedness.
Proper prep minimizes damage risk and improves engine performance after maintenance, helping your snow thrower run reliably throughout the cold season.
How to Safely Remove the Snow Thrower Carburetor
Once your snow thrower is prepped and the fuel system is safely drained, you can begin removing the carburetor.
Prioritize carburetor safety by working in a well-ventilated area and wearing gloves to avoid fuel residue contact.
Start with proper tool selection: use a set of wrenches or sockets that fit the mounting bolts precisely to prevent stripping.
Carefully disconnect the throttle linkage and any fuel lines, noting their positions for reassembly.
Use pliers to gently remove clamps without damaging hoses. Support the carburetor as you loosen fasteners to avoid dropping or damaging it.
Keep all small parts organized in a container.
Avoid forcing components. If a bolt resists, double-check for hidden fasteners.
Following these steps guarantees a safe, efficient removal process, preparing you for thorough cleaning.
How to Clean and Reassemble Your Snow Thrower Carburetor
When you start cleaning your snow thrower carburetor, make certain all parts are free of debris and varnish buildup by soaking them in a carburetor cleaner solution.
Use a soft brush to gently remove any remaining residue, paying close attention to jets, float bowl, and needle valves.
After cleaning, thoroughly dry all components to prevent moisture-related issues in the fuel system.
For proper carburetor maintenance, inspect gaskets and diaphragms, replacing any that show wear or damage.
Reassemble the carburetor by carefully aligning parts in reverse order of disassembly, ensuring seals are tight to avoid leaks.
Tighten screws evenly to maintain structural integrity.
Finally, reinstall the carburetor onto your snow thrower, connecting all fuel lines securely.
This method restores efficient fuel flow and ideal engine performance.
How to Troubleshoot Common Snow Thrower Carburetor Problems
If your snow thrower struggles to start or runs unevenly, the carburetor is often the culprit. Troubleshoot by checking for carburetor leaks, which cause fuel loss and poor engine performance. Fuel clogs block passages, restricting fuel flow and causing stalling or rough idling.
| Symptom | Likely Cause |
|---|---|
| Engine won’t start | Fuel clogs in jets |
| Rough idling | Carburetor leaks |
| Engine stalls | Blocked fuel passages |
First, inspect for visible leaks around gaskets and seals. Next, clean jets and fuel passages thoroughly to remove clogs. If problems persist, replace damaged components. Proper troubleshooting guarantees your snow thrower runs smoothly and reliably during winter.
Frequently Asked Questions
What Type of Fuel Is Best for a Snow Thrower Carburetor?
You should use fresh, unleaded gasoline with the lowest ethanol content possible, ideally under 10%. Higher ethanol levels can harm your carburetor’s performance and cause corrosion, so choosing the best fuel minimizes ethanol impact effectively.
How Often Should I Replace the Carburetor Instead of Cleaning It?
You should replace your carburetor every 5-7 years, as the average carburetor lifespan is about 6 years. If cleaning doesn’t improve performance or corrosion is severe, it’s time for replacement to maintain peak function.
Can I Use a Universal Carburetor Cleaner for All Snow Throwers?
You can use a universal cleaner, but its effectiveness varies. Some carburetor compatibility issues may arise due to material differences, so check your snow thrower’s manual and test on a small part first to avoid damage.
What Are Signs of a Faulty Carburetor Gasket?
If you love carburetor leaks, a faulty gasket’s your dream! Watch for fuel dripping, poor engine performance, and hard starts.
Don’t enjoy it too long. Prompt gasket replacement prevents bigger, costly damage.
Is It Safe to Clean the Carburetor Without Removing It Completely?
You can safely clean the carburetor without removing it by using carburetor maintenance sprays and proper cleaning techniques. However, full removal guarantees thorough cleaning and inspection, preventing future performance issues.
Conclusion
Cleaning your snow thrower carburetor transforms a clogged, sputtering engine into a smooth-running machine ready to tackle winter’s worst. With careful preparation, precise removal, and thorough cleaning, you replace frustration with reliability.
Just as a clear carburetor lets fuel flow freely, your effort guarantees efficient performance and prevents breakdowns. By troubleshooting common issues early, you keep your snow thrower sharp and dependable, turning icy challenges into effortless clearing.
Regular maintenance, including how to clean snow thrower carburetor, ensures your equipment runs efficiently season after season. This essential task helps avoid costly repairs and extends the life of your snow thrower.
