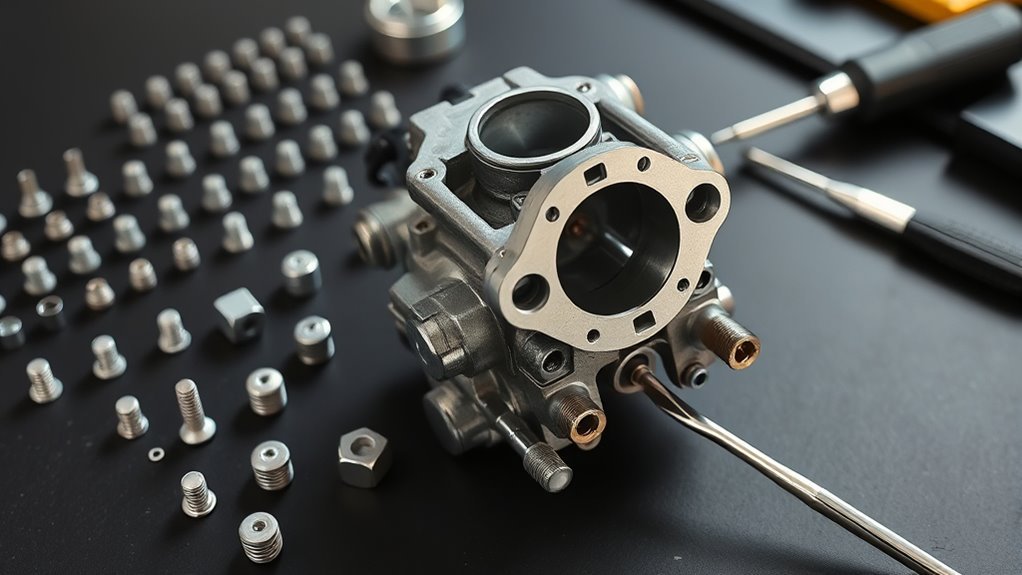
Tag: Kawasaki carburetor

  • How to Rebuild Carburetor From Kawasaki fe290

    How to Rebuild Carburetor From Kawasaki fe290

    You start by safely removing the Kawasaki FE290 carburetor, disconnecting fuel lines and throttle linkages carefully. This is the first essential step in how to rebuild the carburetor from Kawasaki FE290.

    Then, disassemble it by removing jets, float, and needle valve while keeping parts organized. Clean all components with carburetor solvent and inspect for wear like cracks or corrosion.

    Replace worn parts with quality replacements. Reinstall ensuring tight connections, no air leaks, and smooth throttle linkage. After, test and fine-tune idle and throttle response for peak performance.

    The following steps will guide you through each detail precisely.

    Key Takeaways

    • Remove the carburetor by disconnecting the fuel line, throttle linkage, and mounting bolts carefully to avoid damage.
    • Disassemble the carburetor by removing the float bowl, jets, float, and needle valve, keeping parts organized and labeled.
    • Clean all components thoroughly using carburetor cleaner, soft brushes, and compressed air, avoiding harsh abrasives that damage surfaces.
    • Inspect the float, needle valve, gaskets, and metal surfaces for wear or damage, replacing any deteriorated parts with quality replacements.
    • Reinstall the carburetor securely, reconnect all linkages and fuel lines, then start the engine and adjust idle and throttle for optimal performance.

    Signs Your Kawasaki FE290 Carburetor Needs Rebuilding

    When your Kawasaki FE290 carburetor starts showing performance issues, it’s crucial to recognize the specific signs that indicate it needs rebuilding.

    You’ll notice engine starting problems, such as difficulty firing up or prolonged cranking, which often point to fuel delivery inconsistencies caused by clogged jets or worn gaskets.

    Carburetor performance issues also manifest as erratic idling, engine stalling, or reduced throttle response due to improper air-fuel mixture adjustments.

    Excessive black smoke or fuel leaks around the carburetor body are additional red flags signaling internal wear or damaged seals.

    If your engine hesitates under load or produces uneven acceleration, these symptoms further confirm the need for a carburetor rebuild.

    Identifying these precise issues promptly helps maintain effective engine function and prevents more severe mechanical failures.

    Essential Tools for Kawasaki FE290 Carburetor Rebuild

    You’ll need a set of basic hand tools like screwdrivers and wrenches to access and disassemble the Kawasaki FE290 carburetor.

    Carburetor cleaning supplies, including specialized solvents and brushes, are crucial to remove debris and buildup effectively.

    Finally, having a replacement parts kit on hand guarantees you can swap out worn components and restore proper function during the rebuild.

    Basic Hand Tools

    Although rebuilding the Kawasaki FE290 carburetor involves intricate components, having the right basic hand tools simplifies the process and guarantees accuracy.

    To work efficiently, you must prioritize tool organization before starting. This prevents lost parts and streamlines your workflow.

    Essential basic hand tools include:

    1. Precision screwdrivers for removing tiny screws without damaging heads.
    2. Needle-nose pliers to handle small clips and springs securely.
    3. Wrenches (metric sizes) for loosening bolts on the carburetor body.
    4. A small flat file to smooth gasket surfaces ensuring a tight seal.

    With these tools properly organized, you’ll maintain control over delicate parts, reduce errors, and rebuild the carburetor with precision.

    Carburetor Cleaning Supplies

    Proper cleaning supplies play an essential role in restoring the Kawasaki FE290 carburetor to ideal condition.

    To follow effective carburetor maintenance tips, start with high-quality cleaning solvents recommendations like carburetor cleaner sprays containing acetone or xylene, which dissolve varnish and deposits efficiently.

    You’ll also need small, soft-bristle brushes and compressed air to clear jets and passages without damage. A container for soaking parts in solvent helps break down stubborn residues.

    Use lint-free cloths for wiping components dry, avoiding contamination. Precision is key—don’t use harsh abrasives that can alter critical surfaces or orifice sizes.

    Replacement Parts Kit

    After thoroughly cleaning your Kawasaki FE290 carburetor components, the next step involves assembling a replacement parts kit tailored to the model.

    This kit guarantees you replace worn parts that impact performance and prevent leaks or blockages.

    Focus on high-quality components designed specifically for the FE290 to assure compatibility and longevity.

    Your replacement parts kit should include:

    1. Carburetor gasket – essential for sealing joints and preventing air leaks.
    2. Fuel filter – critical for blocking contaminants from entering the carburetor.
    3. Needle valve and seat – controls fuel flow with precision.
    4. Float – regulates fuel level inside the carburetor bowl.

    Having these parts ready allows you to rebuild efficiently, restoring ideal fuel delivery and engine performance.

    How to Safely Remove the Carburetor From Your Kawasaki FE290

    Start by gathering all necessary tools and clearing your workspace to guarantee a smooth removal process.

    Carefully disconnect the fuel line and throttle linkages to prevent damage or leaks.

    Finally, remove the mounting bolts methodically, keeping track of their positions for reassembly.

    Prepare Tools And Workspace

    Gathering the right tools and organizing your workspace are essential steps before removing the carburetor from your Kawasaki FE290. Proper workspace organization guarantees you maintain tool safety and efficiency during the process.

    Clear a flat, well-lit area free of contaminants to prevent dirt from entering the carburetor. Use a non-slip mat to keep parts from rolling away.

    Prepare these essential tools:

    1. Screwdrivers (flathead and Phillips) for fastener removal
    2. Wrenches and sockets sized for carburetor bolts
    3. Needle-nose pliers for handling clips and springs
    4. A small container to safely hold screws and small components

    Following these steps minimizes errors and protects delicate parts during carburetor removal.

    Disconnect Fuel And Linkages

    Two critical steps precede removing the carburetor: disconnecting the fuel line and linkages.

    First, locate the fuel line attached to the carburetor inlet. Using pliers, gently loosen the clamp securing the fuel line, then carefully pull the line off to avoid damaging the hose or causing fuel spillage.

    Next, focus on the throttle linkage. Identify the connection point where the throttle cable attaches to the carburetor lever. Release the retaining clip or fastener securing the throttle linkage, then slide the cable end free.

    Confirm no tension remains on the linkage to prevent bending or breaking. Detaching both the fuel line and throttle linkage cleanly ensures a smooth removal process while safeguarding components for reassembly.

    Always work methodically and contain any fuel to maintain a safe workspace.

    Remove Mounting Bolts Carefully

    Loosen each mounting bolt securing the carburetor to the engine manifold with a properly sized wrench or socket. The Kawasaki FE290 typically uses hex head and flange bolts, so identify the mounting bolt types before proceeding.

    Apply these bolt removal techniques for safety and efficiency:

    1. Use penetrating oil on bolts if they’ve seized or show corrosion.
    2. Turn bolts counterclockwise steadily, avoiding sudden force to prevent stripping.
    3. Keep track of bolt length and position to guarantee proper reinstallation.
    4. Support the carburetor as you remove the last bolt to prevent dropping or damage.

    Disassembling the Carburetor Step-by-Step

    Start by removing the carburetor from the engine, ensuring the fuel line and throttle linkage are disconnected carefully to prevent damage. Place the carburetor on a clean workspace.

    Unscrew the float bowl screws, then remove the float and needle valve gently. Use carburetor assembly techniques to keep parts organized and reduce troubleshooting carburetor issues later.

    Next, detach the main jet and pilot jet with a precision screwdriver. Avoid forcing components to prevent stripping screws.

    Step Key Tip
    Remove float bowl Use proper screwdriver size
    Extract float & valve Handle needle valve delicately
    Unscrew jets Keep parts in labeled containers
    Inspect gaskets Avoid damaging sealing surfaces

    Inspecting Carburetor Components for Wear and Damage

    Before reassembling the carburetor, carefully examine each component for signs of wear, corrosion, or damage that could impair performance. Identifying carburetor wear and component damage early prevents future malfunctions and guarantees peak engine operation.

    1. Inspect the float for cracks or deformation that affect fuel regulation.
    2. Check the needle valve tip for grooves or wear that can cause fuel leaks.
    3. Examine the throttle shaft and bushings for excessive play indicating worn parts.
    4. Assess gaskets and seals for brittleness or tears that lead to air leaks.

    Pay close attention to metal surfaces prone to corrosion or erosion.

    Replace any parts showing significant carburetor wear or damage to maintain reliability and fuel efficiency.

    Cleaning and Replacing Carburetor Parts

    Three essential steps guarantee effective cleaning and replacement of carburetor parts: removing debris, inspecting components, and installing new parts where necessary.

    Start by soaking metal parts in a carburetor-specific cleaning solution, such as an ultrasonic cleaner or a solvent designed to dissolve varnish and gum.

    Begin by immersing metal parts in a carburetor-specific cleaner to dissolve varnish and gum buildup.

    Use carburetor maintenance tips like employing compressed air to clear jets and passages thoroughly. Avoid abrasive tools that can damage precision surfaces.

    After cleaning, inspect parts closely for wear, corrosion, or cracks, especially the float, needle valve, and gaskets.

    Replace any components that show signs of deterioration to guarantee peak performance.

    Always use OEM or high-quality aftermarket parts during reassembly.

    Following these cleaning solution recommendations and careful replacement procedures preserves fuel flow integrity and prolongs your Kawasaki FE290 carburetor’s lifespan.

    Reinstalling and Testing the Kawasaki FE290 Carburetor

    With your carburetor parts thoroughly cleaned, inspected, and replaced as needed, you can now focus on reinstalling the Kawasaki FE290 carburetor.

    Proper carburetor tuning during reinstallation is essential for ideal performance improvement. Follow these steps:

    1. Securely mount the carburetor onto the intake manifold, ensuring all gaskets align perfectly to prevent air leaks.
    2. Reattach the fuel line and throttle linkage, verifying smooth operation without binding.
    3. Connect the choke cable and adjust it for proper engagement.
    4. Start the engine and perform fine carburetor tuning by adjusting the idle mixture screws and throttle stop to achieve stable idle and responsive throttle response.

    Testing under load conditions confirms performance improvement and identifies if further tuning is necessary.

    Frequently Asked Questions

    What Fuel Type Is Best for the Kawasaki FE290?

    You should use unleaded gasoline with a fuel octane rating of at least 87 for the Kawasaki FE290. Avoid fuel additives unless specified, as some can harm the carburetor or engine performance over time.

    How Often Should the Carburetor Be Rebuilt?

    You should perform carburetor maintenance every 100 hours or annually, whichever comes first. Watch for signs of wear like rough idling, fuel leaks, or poor acceleration to rebuild promptly and keep your engine running smoothly.

    Can I Use Aftermarket Carburetor Parts?

    You can use aftermarket performance parts, but watch for compatibility concerns. Verify seals, jets, and floats match your carburetor’s specifications to avoid leaks or poor performance.

    Test thoroughly before full operation to confirm reliability.

    What Are Common Kawasaki FE290 Engine Issues?

    You might think your Kawasaki FE290 engine’s about to explode from carburetor leaks, but common issues usually involve reduced engine performance, clogged jets, worn gaskets, or fuel line cracks. Check these first for practical, effective troubleshooting.

    How to Store the Kawasaki FE290 During Winter?

    For winter preparation, drain fuel or add stabilizer, clean the Kawasaki FE290 thoroughly, and change the oil. Remove the battery and store it in a dry, cool place. These storage tips prevent damage and guarantee reliable startup.

    Conclusion

    Rebuilding your Kawasaki FE290 carburetor might seem like traversing a maze, but with patience and precision, it’s completely manageable. By carefully inspecting, cleaning, and replacing worn parts, you guarantee your engine runs smoothly and efficiently.

    Remember, attention to detail is your best tool—any overlooked debris or damage can throw off performance. Follow each step methodically, and you’ll have your carburetor firing on all cylinders in no time.

    Taking the time to thoroughly rebuild your Kawasaki FE290 carburetor ensures optimal engine function and longevity.