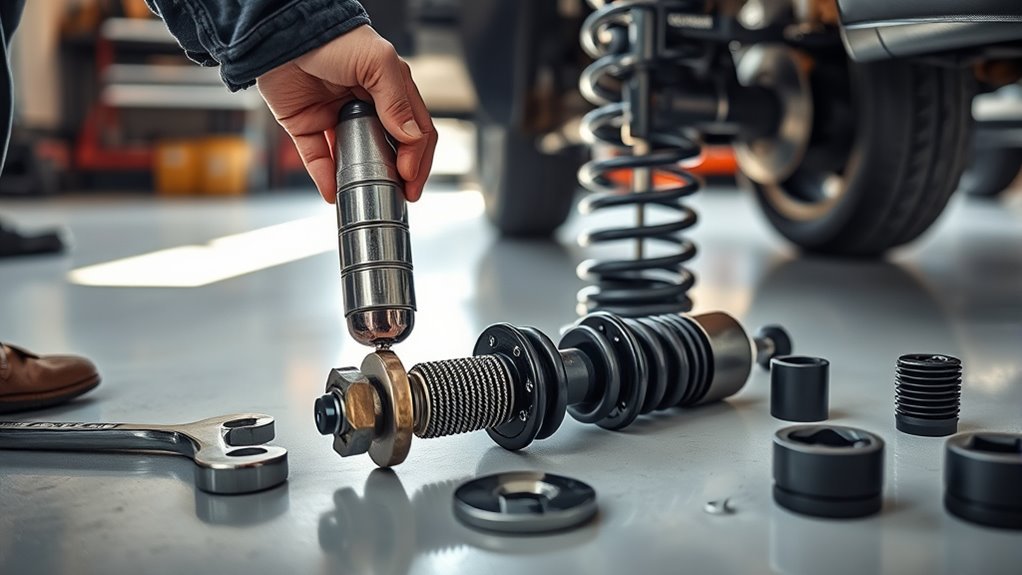
Tag: back shocks

  • How to Change Back Shocks

    How to Change Back Shocks

    You’ll start by safely lifting your vehicle and supporting it with jack stands to change back shocks.

    Next, locate and remove the lower then upper mounting bolts of the old back shocks using the proper socket and wrench. Carefully pull off the worn shocks and align the new ones with the mounts.

    Secure the bolts in reverse order and torque them to specifications. After installation, test their performance with a bounce check and a short drive.

    Learn how to maintain and troubleshoot for lasting shock performance.

    Key Takeaways

    • Inspect rear shocks for leaks, damage, and performance issues before replacement.
    • Safely lift and support the vehicle with a jack and jack stands on a flat surface.
    • Remove lower mounting bolt first, then upper bolt, to detach old back shocks.
    • Align and install new shocks, tightening bolts to manufacturer torque specifications.
    • Perform a bounce test and test drive to ensure proper installation and shock function.

    How to Identify When Your Back Shocks Need Replacing

    How can you tell when your back shocks need replacing? Start by inspecting for clear symptoms of wear such as fluid leaks, dents, or corrosion on the shock body.

    Next, evaluate the performance impact: if your vehicle experiences excessive bouncing after bumps, nose-diving during braking, or uneven tire wear, these are strong indicators.

    Excessive bouncing, nose-diving during braking, or uneven tire wear signal your back shocks need replacement.

    Perform a bounce test by pressing down firmly on the rear of your vehicle and releasing; if it oscillates more than twice, the shocks are likely compromised.

    Additionally, check for unusual noises like clunking or rattling over rough terrain.

    Identifying these symptoms of wear promptly helps maintain vehicle stability and guarantees safe handling.

    Replace your back shocks immediately upon confirming these signs to restore ideal suspension performance.

    Preparing Your Vehicle Safely for Back Shock Replacement

    Before you begin replacing your back shocks, verify your vehicle is securely positioned on a flat, stable surface to prevent any movement during the procedure. Engage the parking brake and place wheel chocks firmly against the front wheels to enhance vehicle stability.

    Next, confirm you follow all safety precautions by wearing protective gloves and eye protection. Use a reliable jack to raise the rear of the vehicle, positioning jack stands under the frame to support the weight securely.

    Never rely solely on the jack, as this compromises safety. Double-check that the vehicle is stable by gently rocking it before proceeding.

    This preparation minimizes risk and guarantees a safe working environment for replacing your back shocks efficiently and effectively.

    Tools and Materials Needed to Change Back Shocks

    Changing back shocks requires specific tools and materials to guarantee a smooth and safe replacement process.

    Before starting, verify you have the right equipment to handle different shock absorber types and to minimize shock replacement cost.

    Essential items include:

    1. Socket set and wrenches. Needed to remove and install bolts securing the shocks.
    2. Jack and jack stands. To safely lift and support the vehicle during the procedure.
    3. Replacement shocks matching your vehicle’s specifications. Selecting the correct shock absorber type guarantees peak performance and durability.

    Having these tools and materials ready will streamline the replacement task, reduce errors, and help control expenses.

    Being prepared with the right tools ensures a smoother process, fewer mistakes, and lower overall costs.

    Avoid substituting or skipping tools, as that can increase shock replacement cost through damage or improper installation.

    Step-by-Step Guide to Removing Old Back Shocks

    Once you’ve securely lifted and supported the vehicle, start by locating the bolts that attach the back shocks to the suspension and frame.

    Identify the shock absorber types installed, as some may require specific tools or methods for removal.

    Use a wrench or socket to loosen and remove the lower mounting bolt first, then proceed to the upper bolt.

    Keep in mind suspension system basics: shocks stabilize ride quality by dampening spring oscillations, so handle them carefully to avoid damage.

    Once both bolts are removed, carefully pull the old shock absorber away from its mounting points.

    Inspect the mounting brackets and bushings for wear or damage before removal.

    This step-by-step approach guarantees safe, efficient removal of old back shocks, preparing you for the next installation phase.

    How to Install New Back Shocks Correctly

    Align the new back shock with its mounting points, verifying the bushings and brackets sit correctly to prevent premature wear.

    Selecting the appropriate shock absorber type compatible with your vehicle is essential before installation. Use proper installation techniques to avoid damage and guarantee peak performance.

    Follow these steps for correct installation:

    1. Secure the top mounting bolt first, then the bottom, maintaining alignment to prevent stress on components.
    2. Torque bolts to manufacturer specifications, using a calibrated torque wrench for accuracy.
    3. Inspect all mounting hardware for wear or damage; replace if necessary to guarantee a secure fit.

    How to Test Your New Back Shocks After Installation

    Although installing new back shocks correctly is crucial, verifying their performance through testing guarantees your vehicle handles as intended.

    Start by conducting a bounce test: push down firmly on the rear of your vehicle and release. The car should settle quickly without excessive oscillation, indicating proper shock performance.

    Perform a bounce test by pressing down on the rear; the car should settle quickly without excessive movement.

    Next, take a controlled test drive on varied surfaces, paying close attention to ride quality, handling, and stability. Listen for unusual noises and observe any excessive body roll or vibration. Monitor how the vehicle responds to bumps, turns, and braking.

    If the ride feels smoother and more controlled compared to before, your shocks are functioning correctly.

    Finally, recheck all mounting hardware to verify nothing loosened during testing. This systematic approach confirms your new back shocks deliver ideal shock performance and ride quality.

    Troubleshooting Common Back Shock Replacement Problems

    If you notice unusual noises or poor handling after replacing your back shocks, start by inspecting the shock mounts for wear or improper installation.

    Check the shock absorbers closely for leaks, as fluid loss compromises their performance.

    Addressing these issues promptly guarantees your suspension functions correctly and safely.

    Identifying Shock Mount Issues

    A common challenge when replacing back shocks is recognizing worn or damaged shock mounts, which can cause noise, vibration, and compromised suspension performance.

    To properly diagnose shock symptoms, conduct a thorough mount inspection before proceeding with shock replacement.

    Pay attention to the following steps:

    1. Visually check the rubber bushings for cracks, deformation, or separation from metal components.
    2. Manually test mount stability by wiggling the shock to detect excessive play or looseness.
    3. Listen for unusual noises during vehicle movement, such as clunks or rattles, which often indicate mount failure.

    Addressing these issues guarantees that you don’t replace shocks unnecessarily while overlooking mount defects that can affect suspension integrity and ride quality.

    Accurate identification prevents repeat repairs and maintains peak vehicle performance.

    Handling Leaking Shock Absorbers

    When you notice oil leaking from your back shock absorbers, it signals a failure in the internal seals that compromises damping efficiency. Address leaking symptoms promptly to avoid further suspension damage.

    Inspect the shock fluid for contamination or low levels as these indicate seal failure. Replace leaking shocks immediately to restore ride quality.

    Leaking Symptom Cause
    Visible oil on shock body Seal failure
    Reduced damping effect Shock fluid loss
    Excessive bouncing Low shock fluid pressure
    Corrosion around shocks Fluid contamination
    Uneven tire wear Compromised shock performance

    Use proper tools and follow manufacturer torque specs when replacing shocks to prevent recurrence of leaks.

    Resolving Noisy Suspension Problems

    Leaking shock absorbers often cause noticeable noise in your suspension system, signaling the need for careful troubleshooting.

    To resolve suspension noise effectively, start by inspecting the shock absorber mounting points for looseness or wear.

    Next, check the shock absorber bushings for deterioration, as damaged bushings can transmit noise.

    Finally, verify that the shock absorber itself isn’t internally damaged or clogged.

    1. Tighten or replace loose mounting hardware.
    2. Replace worn or cracked bushings promptly.
    3. Swap out faulty shock absorbers to restore proper damping.

    Simple Maintenance Tips to Extend Back Shock Life

    Although back shocks are built to withstand rough conditions, you should regularly inspect and maintain them to maximize their lifespan. Proper shock absorber maintenance helps you extend shock lifespan by preventing premature wear and guaranteeing peak performance.

    Check for leaks, corrosion, and loose mounts monthly. Clean dirt buildup to avoid abrasion. Lubricate pivot points as needed.

    Maintenance Task Frequency Purpose
    Visual Inspection Monthly Detect leaks, damage
    Cleaning Every 3 months Remove dirt, prevent rust
    Lubrication Every 6 months Guarantee smooth operation

    Frequently Asked Questions

    Can I Upgrade to Performance Back Shocks?

    Yes, you can upgrade to performance back shocks if you guarantee shock compatibility with your vehicle. Doing so provides performance benefits like improved handling and ride quality.

    Always verify fitment specifications before installation.

    How Do Back Shocks Affect Fuel Efficiency?

    Like a telegraph speeding messages, properly functioning shock absorbers optimize tire contact, reducing drag and improving fuel efficiency.

    If your back shocks wear out, you’ll experience more rolling resistance and decreased miles per gallon.

    Are Back Shocks Universal or Vehicle-Specific?

    Back shocks aren’t universal; you’ll need to check shock compatibility based on your vehicle’s make and model. The installation process varies, so always use vehicle-specific shocks to guarantee proper fit and peak performance.

    What’s the Average Cost of Professional Back Shock Replacement?

    You can expect shock replacement costs with professional installation to range between $200 and $400 per axle, depending on your vehicle type and location.

    Always verify labor rates and parts quality for accurate estimates.

    Can Bad Back Shocks Cause Tire Wear?

    Bad back shocks act like a broken compass, throwing off your tire alignment and causing uneven tire wear. Watch for shock symptoms like bouncing or swaying, as these indicate your shocks aren’t absorbing impacts properly, damaging tires.

    Conclusion

    Changing your back shocks might seem intimidating, but with the right tools and steps, you can handle it confidently and save money. Don’t worry about complex mechanics—this guide breaks it down clearly, ensuring safety and accuracy throughout.

    Once installed, test your shocks to guarantee a smooth ride. Regular maintenance will keep them lasting longer.

    Taking control of this repair not only improves your vehicle’s performance but also boosts your mechanical skills. Learning how to change back shocks empowers you to maintain your car effectively and enjoy a better driving experience.